You can use IP networks from INTERLIR Marketplace as BYOIPs for Cloudflare . With Bringing Your Own IPs (BYOIP), Cloudflare announces your IPs in all our locations. Use your IPs with Magic Transit, Spectrum, or CDN services. BYOIP is compatible with Magic Transit, Spectrum, and CDN services.
Get started
To bring your own IPs, you must go through the onboarding process. Work with your account team to understand everything you need to ensure a smooth transition.
Cloudflare requires a service-specific configuration for your prefixes, as well as some requirements common to all BYOIP customers regardless of service type. These requirements are common to all products compatible with BYOIP, such as Magic Transit, CDN, and Spectrum.
Cloudflare must receive a Letter of Authorization to announce your prefixes, which we will share with our transit partners as evidence that we are allowed to announce the route.
Optionally, if you use the RPKI protocol to sign your routes, Cloudflare can help with this as well. Just let your account team know if you’re interested in using RPKI.
With INTERLIR Marketplace, you have the flexibility to use the rented IPs as Bring Your Own IP (BYOIP) with Google Cloud. BYOIP allows you to provision and utilize your own public IPv4 addresses for your Google Cloud resources. This feature enables seamless integration of your existing IP addresses with the Google Cloud platform, providing you with more control and convenience in managing your network infrastructure.
Once the IP addresses are imported into Google Cloud through BYOIP, Google manages them in a manner similar to its own provided IP addresses, with a few exceptions:
The imported IP addresses are exclusively available to the customer who brought them, ensuring dedicated usage.
There are no charges for idle or in-use IP addresses, providing cost efficiency for the customer.
Google Cloud does not allow overlapping BYOIP route announcements. This means that if an IP address range, such as 203.0.112.0/23, or a subset of it, such as 203.0.112.0/24, is already being advertised outside of Google, importing the same range or a subset of it into Google Cloud is not supported. Having overlapping route announcements with matching or mismatched prefix lengths between Google and another network can lead to unexpected routing issues and packet loss.
For managing the route advertisement of your imported prefix, Google Cloud offers a feature called live migration. Live migration allows you to control the timing of when Google Cloud starts advertising routes for your imported IP address range. However, it’s important to note that live migration is not available by default and needs to be requested from Google Cloud. To request access to the live migration feature, you can reach out to your Google Cloud representative.
Overview
To bring your own IP to Google Cloud, you first create a public advertised prefix (PAP). Verification of ownership is performed for this PAP through the use of Route Origin Authorization (ROA) and reverse DNS validation. After successful verification, the announcement of this PAP to the internet is configured, but the prefix is not advertised until it undergoes provisioning. The provisioning process for the public advertised prefix typically takes up to four weeks.
During the waiting period for provisioning, you divide the prefix into public delegated prefixes (PDP). These PDPs can have either regional or global scope, and you have the option to further divide them or use them to create assignable IP addresses. The provisioning of the public delegated prefix also takes up to four weeks
Once the provisioning of the public delegated prefix is completed, the public advertised prefix is then advertised to the internet. If you are using live migration, there may be additional steps involved, so it is recommended to refer to the specific guidelines for using live migration provided by Google Cloud.
Public Advertised Prefixes
A public advertised prefix (PAP) is a resource within Google Cloud’s Compute Engine that allows you to bring your own IP prefix to the platform. This enables you to allocate IP addresses from your own prefix to Google Cloud resources. The PAP represents a single unit of route advertisement, and Google’s global backbone advertises it from all of its points of presence. IP addresses within the public advertised prefix always utilize the Premium Tier of Network Service Tiers.
When creating a new public advertised prefix, it must have an IPv4 IP range with a minimum CIDR range of /24. It is not possible to create a new public advertised prefix with a smaller CIDR range, such as /25. However, once a public advertised prefix is created, you have the flexibility to break it up into smaller public delegated prefixes, such as /24 or /23.
Public delegated prefixes
A public delegated prefix (PDP) is a specific IP block within your public advertised prefix that is configured to operate within a defined scope, which can be a particular region or global in Google Cloud. Before you can allocate IP addresses to your project or organization, these IP blocks must be delegated and assigned to a specific scope.
Google Cloud provides the flexibility to break up a public advertised prefix into multiple public delegated prefixes. Each of these public delegated prefixes can be configured with its own scope in your Google Cloud projects. Additionally, you have the option to further divide a single public delegated prefix into multiple smaller blocks, but it is important to note that these smaller blocks must have the same scope as the parent block. Within a given scope, you can also configure multiple non-contiguous public delegated prefixes, which are also referred to as sub-prefixes.
IP addresses
Once IP addresses are created from a public delegated prefix, they are restricted for use within the specific project and scope to which they are allocated. Any user with the appropriate IAM permissions in the project can utilize these IP addresses for their designated purposes:
compute.addresses.* for regional IP addresses
compute.globalAddresses.* for global IP addresses
Public IP Admin role
To appoint an administrator for your BYOIP prefixes and addresses, you can grant them the Compute Public IP Admin role (roles/compute.publicIpAdmin). With this role, they gain the ability to manage publicly routable IPs within your organization.
The Public IP Admin’s tasks include:
Configuring public advertised prefixes within their own project.
Setting up public delegated prefixes using the configured public advertised prefixes within their own project.
Delegating sub-prefixes from the public delegated prefixes to specific projects within the organization.
Revoking previously delegated sub-prefixes from the public delegated prefixes for specific projects within the organization.
Deleting public delegated prefixes.
Planning your deployment
Effective planning is crucial when deploying BYOIP addresses, as the provisioning and deletion processes can take several weeks to complete. To aid in the planning process, consider the following decisions:
Administration Responsibility: Determine who will be responsible for administering the BYOIP addresses. Usually, this is an admin or a specific group, distinct from those managing individual projects. Use IAM roles and permissions to differentiate privileges for public advertised and delegated prefixes.
Prefix Management: Consider how prefixes will be managed across different projects. It is recommended to centrally manage prefixes in a dedicated project, separate from the projects where IP addresses will be utilized. This isolation helps avoid confusion and unauthorized use of prefixes.
Naming Convention: Each BYOIP resource (public advertised prefix, public delegated prefix, sub-prefix) requires a name for management purposes. Select descriptive and easily manageable names during resource creation, as they cannot be changed without recreating the resource.
Provisioning Locations: Think of the provisioning process as “stocking” IPs into regions or the global scope. Plan and deploy public delegated prefixes well ahead of their actual need, as provisioning takes several weeks. If unsure about where IPs will be used, provision only the prefixes needed immediately. Moving a public delegated prefix requires deletion and recreation, which can take up to eight weeks. Once provisioning is complete, delegate sub-prefixes to projects and create addresses for use with resources.
To illustrate, let’s say you have a /24 public advertised prefix and require IPs in us-central1 and for global load balancers, with some reserved for future use. You could create the following plan:
Public Advertised Prefix: 203.0.113.0/24
Public Delegated Prefix: 203.0.113.0/28 (for us-central1)
Public Delegated Prefix: 203.0.113.16/28 (for global)
Remaining IP addresses reserved for future use.
By planning ahead and effectively managing prefixes, you can ensure smooth deployment of BYOIP addresses in your Google Cloud projects.
Live Migration
Live migration is a powerful feature that allows you to import a BYOIP prefix when any part of the prefix is already publicly advertised. It requires careful planning and execution to avoid unexpected routing and packet loss.
To use live migration, ensure that the prefix you are importing is not already being advertised. Live migration is not widely available, so contact your Google Cloud representative to request access before creating a public delegated prefix with live migration enabled.
To enable live migration, you must create a public delegated prefix and ensure that all public delegated prefixes within the public advertised prefix have regional scope, not global scope.
Additionally, ensure that no IP addresses within the range of the public advertised prefix are assigned to any resources. By following these recommendations and configurations, you can prevent Google from advertising the public advertised prefix to peers during the migration process.
Figure 2 illustrates the different configurations in a project, with one preventing the prefix from being advertised and two others causing the public advertised prefix to be advertised. Carefully managing the scope and IP address assignments will ensure a successful live migration of your BYOIP prefix.
Figure 2. Public advertised prefix advertisement during live migration (click to enlarge).
Figure 2 presents three scenarios to illustrate the outcomes of using live migration for public delegated prefixes within a public advertised prefix:
In the first project example, all public delegated prefixes in the public advertised prefix have live migration enabled, but no virtual machines (VMs) are configured with IP addresses from this prefix. As a result, the public advertised prefix is not advertised.
In the second project example, all public delegated prefixes in the public advertised prefix have live migration enabled, and one VM is configured with an IP address from this prefix. In this case, the public advertised prefix is advertised.
In the third project example, one public delegated prefix within the public advertised prefix is not configured with live migration enabled, but no VMs are configured with IP addresses from this prefix. Despite the other delegated prefixes having live migration enabled, the public advertised prefix is still advertised.
You have control over when the advertisement of the public advertised prefix starts by assigning IP addresses from your public delegated prefix to Google Cloud resources. For detailed information on using live migration, refer to the relevant documentation.
After completing the live migration process, it is advisable to contact your Google Cloud representative to disable live migration for your prefix. By default, live migration is disabled 30 days after the start of the advertisement of the public advertised prefix. If you need the live migration option available for a longer duration, make sure to communicate this to your Google Cloud representative.
Live migration limitations
When considering a live migration, it’s crucial to be aware of specific requirements and limitations:
Public delegated prefixes with live migration enabled cannot have a global scope; they must be configured with a regional scope. Refer to the live migration recommendations for managing live migration with global resources.
The longest prefix that can be migrated through live migration is a /24, as this is the maximum routable prefix length on the internet.
Keep in mind that not all of Google’s peers may respect the longest prefix between two sites. Some peers might not have complete routing tables, leading to a situation where a shorter prefix advertised by Google takes precedence for those peers. This means that the existence of any prefix from Google will have priority, even if you are advertising a more specific route from your on-premises location.
For example, suppose you have a /23 prefix actively routed from your on-premises location. You plan to disaggregate the /23 into two /24 prefixes and announce the more specific routes from your on-premises location. Simultaneously, you configure a /23 public advertised prefix for BYOIP. While you may assume that the more specific on-premises routes take precedence over the shorter BYOIP prefix, this may not always be the case:
Google peers with complete routing tables will prefer the more specific /24 on-premises prefixes.
Google peers with incomplete routing tables will prefer the public advertised prefix announced by Google since their routing tables lack the more specific prefixes.
It’s crucial to understand that if Google receives traffic for a valid public advertised prefix for which you haven’t provisioned services, even if there is an active on-premises advertisement for the prefix, the traffic will not be delivered to you. For instance, if you have an on-premises network with two /24 prefixes and a public advertised prefix is the aggregate /23, migrating a single /24 to Google and withdrawing the on-premises prefix while leaving the other /24 active in the on-premises location can lead to some traffic routing to Google for the whole /23 prefix. This can cause confusion since the traffic is delivered to different destinations based on the routing paths of various Autonomous Systems. As a result, it’s important to carefully plan and configure your live migration to avoid unexpected routing issues and ensure proper traffic delivery.
Live migration recommendations
Here are the recommended best practices for using live migration:
Disaggregate all prefixes intended for live migration into the longest prefixes that accurately reflect how you want to advertise them during migration. For example, if you have a /23 prefix, it should be disaggregated into two /24 prefixes and announced as such from your on-premises location before creating the public advertised prefix.
Create exact prefix length Route Origin Authorization (ROA) requests and avoid relying on the maximum length parameter to be respected. This ensures precise and reliable authorization for the prefixes.
Ensure that RPKI ROA requests exist for both the on-premises origin Autonomous System Number (ASN) and Google’s origin ASN. Having proper ROAs for both origins is important as lacking a ROA for the on-premises prefix while creating a Google origin ROA might cause third-party Internet Service Providers (ISPs) to filter out the on-premises prefixes if they are using automatic RPKI filtering.
If you need to use live migration, create separate public advertised prefixes for global resources and regional resources. Enabling live migration on a public delegated prefix requires specifying a region for the scope. It’s not supported to specify global scope for a public delegated prefix with live migration enabled. By having regional prefixes in one public advertised prefix and global prefixes in another public advertised prefix, you can manage them separately. You can then handle the live migration of regional resources while working with your Google Cloud representative to manage the live migration of global resources. This separation allows for better control and management of the live migration process.
Project architecture
We advise using organizations to take advantage of features like centralized IAM permissions and Shared VPC, providing improved resource management and security in your Google Cloud environment.
BYOIP address administration in an organization
In this scenario, within an organization, a separate project called “Public IP Project” is designated to manage BYOIP addresses. The Public IP Admin, who oversees IP address management for the organization, creates the public advertised prefix and public delegated prefixes within this project.
When a VPC Project requires public IP addresses, the Public IP Admin creates the necessary IP addresses within the VPC Project.
The organization has the flexibility to have multiple projects, and the Public IP Admin can delegate IP addresses to all of them from the central “Public IP Project.” This centralized approach streamlines IP address management across the organization’s projects.
Figure 3. You can use organizations and projects to manage BYOIP addresses.
BYOIP addresses administration with Shared VPC
In this organization with Shared VPC, a separate project called “Public IP Project” is designated to manage BYOIP addresses. The Public IP Admin, responsible for IP address management across the organization, has created the public advertised prefix and public delegated prefixes within this central project.
When the Shared VPC Host Project or related service projects require public IP addresses, the Public IP Admin creates the necessary IP addresses within the Shared VPC Host Project. Both the host project and service projects can access the BYOIP addresses from the host project.
It’s important to note that creating IP addresses directly in a Shared VPC service project is not supported; all IP address management occurs within the central “Public IP Project” and is shared across the relevant projects within the organization.
Figure 4. You can delegate BYOIP addresses to a Shared VPC host project, but not to a Shared VPC service project. However, a service project can use BYOIP addresses that were delegated to the host project.
BYOIP address administration without an organization
If your project is not part of an organization, you cannot create a separate project solely for BYOIP address administration. In such cases, you must create the public advertised prefix and public delegated prefixes directly within the same project that requires the use of BYOIP addresses.
At INTERLIR Marketplace, you have the option to rent IP addresses that can be utilized as Amazon EC2 BYOIP (Bring Your Own IP) addresses. This allows you to bring a portion or all of your publicly routable IPv4 or IPv6 address range from your on-premises network to your AWS (Amazon Web Services) account. While you retain control over the address range, AWS will advertise it on the internet by default. Once you integrate the address range with AWS, it will be available in your AWS account as an address pool.
Not all Regions and resources support BYOIP (Bring Your Own IP). To find the list of supported Regions and resources, please refer to the BYOIP FAQ.
X.509 Self-sign certificate — A certificate standard used for encrypting and authenticating data within a network. AWS utilizes this certificate to validate control over IP space from an RDAP record.
Registry Data Access Protocol (RDAP) — A querying resource used to access registration data. Customers update this data, and AWS employs it to verify control of an address space in the Regional Internet Registries (RIR).
Route Origin Authorization (ROA) — An object created by RIRs to authenticate IP advertisement in specific autonomous systems. This helps ensure the validity of IP address allocation.
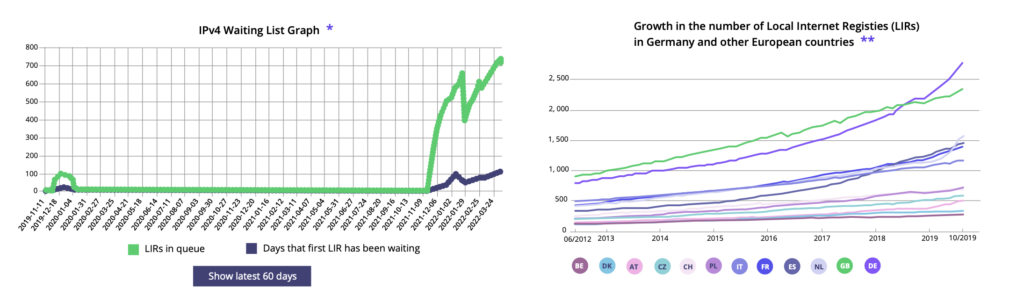
Local Internet Registry (LIR) — Organizations like internet service providers that allocate blocks of IP addresses from a RIR to their customers. They act as intermediaries between RIRs and end-users.
Requirements and limitations for BYOIP
Address Range Registration:
The address range must be registered with a regional internet registry (RIR) such as ARIN, RIPE, or APNIC.
The registration must be under a business or institutional entity and cannot be registered to an individual person.
Specific IPv4 and IPv6 Address Ranges:
The most specific IPv4 address range allowed is /24.
The most specific IPv6 address range allowed is /48 for publicly advertised CIDRs and /56 for non-publicly advertised CIDRs.
ROAs and RDAP Records:
ROAs are not required for non-publicly advertised CIDR ranges, but RDAP records still need to be updated.
Limitations and Integration:
Each address range can only be brought to one AWS Region at a time.
A total of five IPv4 and IPv6 address ranges can be brought to your AWS account per Region.
IP address ranges cannot be shared with other AWS accounts using AWS RAM unless integrated with Amazon VPC IP Address Manager (IPAM) and AWS Organizations.
IP Address History and Support:
Addresses in the IP address range must have a clean history, and AWS reserves the right to reject an IP address range with a poor reputation or associated with malicious behavior.
Legacy allocations are not supported by AWS.
Update Process for LIRs:
LIRs commonly use a manual process to update their records, which may take days to deploy depending on the LIR.
Single ROA and RDAP Record for Large CIDR Blocks:
A single ROA object and RDAP record are needed for a large CIDR block, and multiple smaller CIDR blocks from the same range can be brought to AWS using the single object and record.
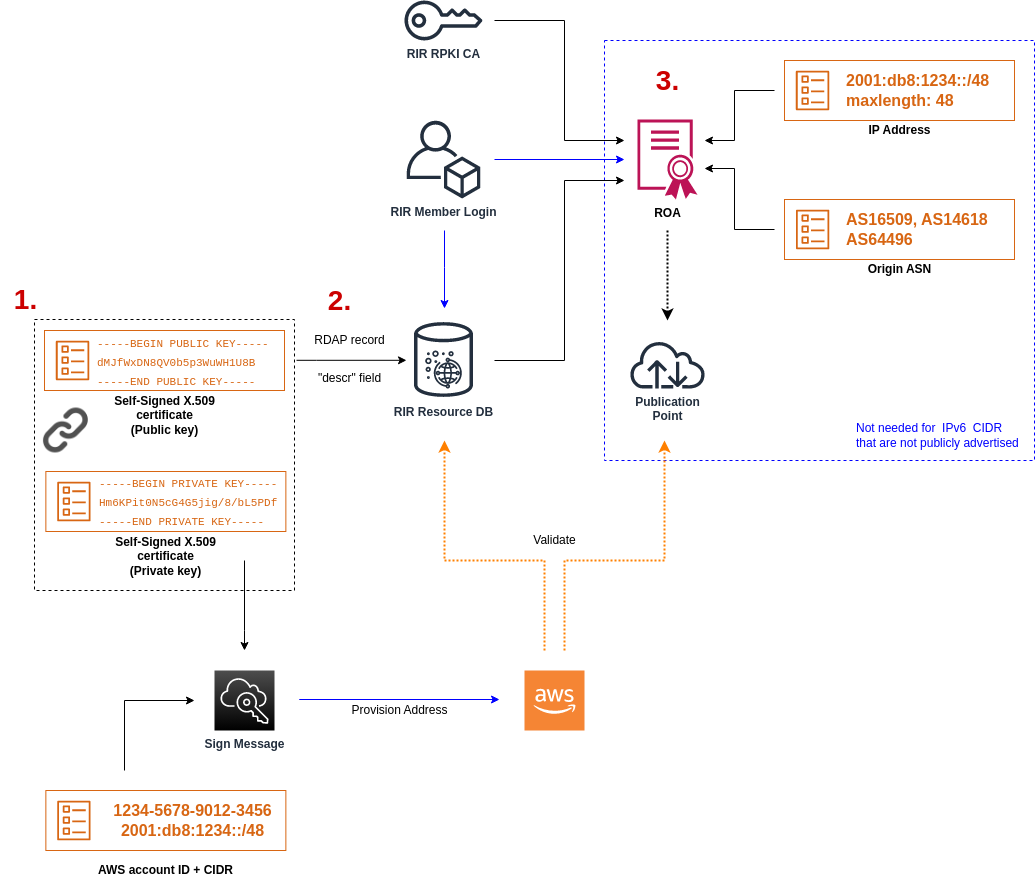
Prerequisites for onboarding your BYOIP address range
The onboarding process for BYOIP consists of two phases, each requiring three specific steps, as illustrated in the diagram below.
3. Create an ROA object in your RIR, specifying the desired address range, allowed Autonomous System Numbers (ASNs) for advertising the range, and an expiration date for registration with the Resource Public Key Infrastructure (RPKI) of your RIR.
Note: An ROA is not necessary for non-publicly advertised IPv6 address space.
To bring on multiple non-contiguous address ranges, you need to repeat this process for each range. However, if splitting a contiguous block across different Regions, the preparation and RIR configuration steps do not need to be repeated.
The onboarding of an address range does not affect any previously brought-on address ranges.
Before proceeding with the address range onboarding, ensure you complete the necessary prerequisites. Some tasks involve running Linux commands, and on Windows, you can utilize the Windows Subsystem for Linux to execute these commands.
1. Create a key pair for AWS authentication
Use the following procedure to create a self-signed X.509 certificate and add it to the RDAP record for your RIR. This key pair is used to authenticate the address range with the RIR. The openssl commands require OpenSSL version 1.0.2 or later.
Copy the following commands and replace only the placeholder values (in colored italic text).
To create a self-signed X.509 certificate and add it to the RDAP record
This procedure follows the best practice of encrypting your private RSA key and requiring a passphrase to access it.
2. Upload the RDAP record to your RIR
Add the certificate that you previously created to the RDAP record for your RIR. Be sure to include the -----BEGIN CERTIFICATE----- and -----END CERTIFICATE----- strings before and after the encoded portion. All of this content must be on a single, long line. The procedure for updating RDAP depends on your RIR:
For ARIN, add the certificate in the “Public Comments” section for your address range. Do not add it to the comments section for your organization.
For RIPE, add the certificate as a new “descr” field for your address range. Do not add it to the comments section for your organization.
For APNIC, email the public key to [email protected] to manually add it to the “remarks” field for your address range. Send the email using the APNIC authorized contact for the IP addresses.
3. Create an ROA object in your RIR
Create an ROA object to authorize the Amazon ASNs 16509 and 14618 to advertise your address range, as well as the ASNs that are currently authorized to advertise the address range. For the AWS GovCloud (US) Region, authorize ASN 8987. You must set the maximum length to the size of the smallest prefix that you want to bring (for example, /24). It might take up to 24 hours for the ROA to become available to Amazon. For more information, consult your RIR:
Before migrating advertisements from an on-premises workload to AWS, it is crucial to create a Route Origin Authorization (ROA) for your existing Autonomous System Number (ASN) first. Only after creating the ROA for your existing ASN should you proceed to create the ROAs for Amazon’s ASNs. Failing to follow this sequence might result in potential impacts to your existing routing and advertisements.
Note: This step is not required for non-publicly advertised IPv6 address space.
Steps to onboard your BYOIP
The onboarding process for BYOIP has the following tasks depending on your needs:
Provision a publicly advertised address range in AWS
When you provision an address range for use with AWS, you are declaring that you have control over the address range and granting Amazon the authorization to advertise it. To verify your ownership of the address range, we require a signed authorization message. This message is signed using the self-signed X.509 key pair that you used to update the RDAP record with the X.509 certificate. AWS mandates a cryptographically signed authorization message, which is then presented to the Regional Internet Registry (RIR). The RIR authenticates the signature against the certificate you added to RDAP and cross-checks the authorization details against the Route Origin Authorization (ROA). This verification process ensures the legitimate ownership and proper handling of the address range.
provision of the address range
Compose message. Compose the plaintext authorization message. The format of the message is as follows, where the date is the expiry date of the message: 1|aws|account|cidr|YYYYMMDD|SHA256|RSAPSSReplace the account number, address range, and expiry date with your own values to create a message resembling the following: text_message="1|aws|0123456789AB|198.51.100.0/24|20211231|SHA256|RSAPSS". This is not to be confused with an ROA message, which has a similar appearance.
Sign message.Sign the plaintext message using the private key that you created previously. The signature returned by this command is a long string that you need to use in the next step.
Important: We recommend that you copy and paste this command. Except for the message content, do not modify or replace any of the values.signed_message=$( echo -n $text_message | openssl dgst -sha256 -sigopt rsa_padding_mode:pss -sigopt rsa_pss_saltlen:-1 -sign private-key.pem -keyform PEM | openssl base64 | tr -- '+=/' '-_~' | tr -d "\n").
Provision address. Use the AWS CLI provision-byoip-cidr command to provision the address range. The --cidr-authorization-context option uses the message and signature strings that you created previously.
Important: You must specify the AWS Region where the BYOIP range should be provisioned if it differs from your AWS CLI configurationDefault region name.aws ec2 provision-byoip-cidr --cidr address-range --cidr-authorization-context Message="$text_message",Signature="$signed_message" --region us-east-1
Provisioning an address range is an asynchronous operation, so the call returns immediately, but the address range is not ready to use until its status changes from pending-provision to provisioned.
Monitor progress. It can take up to one week to complete the provisioning process for publicly advertisable ranges. Use the describe-byoip-cidrs command to monitor progress, as in this example:aws ec2 describe-byoip-cidrs --max-results 5 --region us-east-1
If there are issues during provisioning and the status goes to failed-provision, you must run the provision-byoip-cidr command again after the issues have been resolved.
Provision an IPv6 address range that’s not publicly advertised
By default, when you provision an address range, it is set to be publicly advertised on the internet. However, for IPv6 address ranges, you have the option to provision them as non-public, meaning they won’t be advertised to the internet. The provisioning process for non-publicly advertisable routes typically completes within a few minutes. When you associate a non-public IPv6 CIDR block with a Virtual Private Cloud (VPC), access to the IPv6 CIDR is only possible through hybrid connectivity options that support IPv6, such as AWS Direct Connect, AWS Site-to-Site VPN, or Amazon VPC Transit Gateways.
For non-public address ranges, there is no requirement to create a Route Origin Authorization (ROA) during the provisioning process.
Important:
You can only specify whether an address range is publicly advertised during provisioning. You cannot change the advertisable status later on.
To provision an IPv6 address range that will not be publicly advertised, use the following provision-byoip-cidr command.
Once the address range is provisioned, it is ready to be advertised. It’s important to note that you must advertise the exact address range that was provisioned and cannot advertise only a portion of it.
If you have provisioned an IPv6 address range that will not be publicly advertised, you can skip this step.
Before advertising the address range through AWS, we recommend stopping its advertisement from other locations. Continuing to advertise the same IP address range from other locations may lead to unreliable support and troubleshooting. To ensure a smooth transition, you can configure your AWS resources to use an address from your address pool before it is advertised, and then simultaneously stop advertising it from the current location and start advertising it through AWS. For detailed guidance on allocating an Elastic IP address from your address pool, refer to the instructions for “Allocate an Elastic IP address.“
Limitations
You can run the advertise-byoip-cidr command at most once every 10 seconds, even if you specify different address ranges each time.
You can run the withdraw-byoip-cidr command at most once every 10 seconds, even if you specify different address ranges each time.
To stop using your address range with AWS, first release any Elastic IP addresses and disassociate any IPv6 CIDR blocks that are still allocated from the address pool. Then stop advertising the address range, and finally, deprovision the address range.
You cannot deprovision a portion of the address range. If you want to use a more specific address range with AWS, deprovision the entire address range and provision a more specific address range.
(IPv4) To release each Elastic IP address, use the following release-address command.
It can take up to a day to deprovision an address range.
Work with your address range
You can view and use the IPv4 and IPv6 address ranges that you’ve provisioned in your account.
IPv4 address ranges
You can create an Elastic IP address from your IPv4 address pool and use it with your AWS resources, such as EC2 instances, NAT gateways, and Network Load Balancers.
To view information about the IPv4 address pools that you’ve provisioned in your account, use the following describe-public-ipv4-pools command.
To create an Elastic IP address from your IPv4 address pool, use the allocate-address command. You can use the --public-ipv4-pool option to specify the ID of the address pool returned by describe-byoip-cidrs. Or you can use the --address option to specify an address from the address range that you provisioned.
The depletion of IPv4 addresses is a pressing issue, and companies are realizing the need to purchase IPv4 addresses to bridge the gap during the transition to IPv6. This process requires time and commitment, and it’s important not to delay. Once the transition begins, it becomes irreversible, highlighting the urgency of investing in IPv4 addresses. At Interlir Marketplace, we offer convenient services and excellent deals based on our extensive experience and knowledge of rules and regulations. This makes the transition smoother for all parties involved. Transitioning to IPv6 is crucial for businesses to reach their full potential, as IPv6 provides a significantly larger address space. Buying IP addresses now is essential before prices rise or availability becomes limited. Manual acquisition of IPv4 addresses can be time-consuming and costly, which is why working with experienced experts like us ensures a fast and affordable process.
Do you want to find out why Interlir Marketplace is perfect for purchasing IP address blocks?
Acquiring IPv4 addresses may seem complex, but with the guidance of an experienced IP broker, the process becomes much simpler. An expert in the industry can navigate the market and consider various factors to ensure a smooth transaction. With their assistance, finding a trustworthy source of IPv4 addresses becomes easier, and tasks are completed efficiently. Instead of getting overwhelmed by negotiating prices or dealing with paperwork, you can rely on the expertise of an IP broker who can help you save time and streamline the process.
A decade of experience buying and selling IP addresses.
Allow InterLIR to handle the administrative aspects involved in buying or selling an IP address. As a reputable broker, we will take charge of negotiating with sellers and buyers, obtaining authorization from registries, and mitigating any liability risks that may arise during the transaction. To make your purchase process more convenient, simply provide us with your contact information and specify the type of IPv4 address(es) you wish to buy or sell. This is all that is needed for us to provide you with detailed instructions on how to proceed with the transaction.
Get your share of IPv4 addresses now!
We have witnessed numerous contracts and deals in our career. Whether it’s large-scale corporate transactions or individual buyouts, the risk factor is always present and can unexpectedly come into play.
However, there’s no need to worry because we take care of all the risks involved. Both parties involved in the transaction are fully protected and will be compensated if any unforeseen issues arise at the last minute. This ensures that there are no unpleasant surprises when closing the deal.
You can rest assured that whatever has been agreed upon will come to fruition if everything goes according to plan. So, if you’re considering selling IPv4 addresses or seeking guidance before going through the procedures yourself, now is the perfect time!
With a decade of experience, the InterLIR Marketplace team has successfully facilitated transactions between buyers and sellers since 2012. Our extensive understanding of the process has earned us a reputation as one of the most trusted and reliable brokers in the industry.
For buyers, rely on us to negotiate on your behalf and handle all the tedious administrative tasks when purchasing IPv4 addresses. And for sellers, let us take care of the heavy lifting so you can focus on generating revenue.
Acquiring IPv4 address space requires diligence and planning. It’s a time-consuming process involving various stakeholders who are not easily swayed. Rushing through the process can lead to complications and setbacks. Therefore, it’s important to be prepared, knowing the specific type of IPv4 block or address range you’re looking for and the current market price.
To purchase IPv4 address space, it’s essential to take pragmatic measures. This includes being ready to sell or trade your unused IPv4 addresses, understanding how to find suitable IP blocks or address ranges, and being proactive in reaching out and setting up deals. Our aim is to ensure a smooth and hassle-free experience for anyone looking to buy IPv4 addresses.
While the prospect of buying IPv4 addresses may seem daunting, understanding the requirements and taking a patient and nuanced approach can simplify the process. We prioritize customer satisfaction and have honed our expertise over the years to provide client-oriented services, guiding customers based on their specific needs. With our expertise and assistance, venturing into the market becomes a headache-free endeavor.Customer satisfaction has always been our top priority. For more than a decade, we have specialized in meeting the needs of clients worldwide. From providing recommendations on obtaining IPv4 addresses at competitive prices to assisting with strategic marketing campaigns, we have accumulated valuable knowledge and experience to ensure a successful journey for our clients.
We handle everything, including IP address purchases
the process, don’t hesitate to reach out to us. Our team of experts is available to answer your questions and help you choose the best package that suits your needs. Our streamlined and transparent process ensures that you save time and money – and who wouldn’t want that? It’s important to gather all the necessary information before making an informed decision. Approach IP address purchases like buying property – careful planning is crucial. As there will be others competing for the same resources, it’s important to consider all your requirements before proceeding. Additionally, since there may be competing bids, the price you offer could become obsolete if someone else bids higher. To avoid this situation, conducting research beforehand and understanding the expected costs will enable you to negotiate more effectively.
Check our guideline on detailed process of purchasing ip address blocks – Checklist